Introduction
Salesforce platform administrators sometimes face the challenge of deleting Apex Triggers in production. This can happen when they need to uninstall Managed Packages that generate Apex Triggers during installation. This blog post serves as a comprehensive guide to navigate this task efficiently, including how to handle potential error messages.
Precautions before Deleting Apex Triggers
Deleting Apex Triggers or any other metadata from a production environment needs careful consideration. Always make a backup of your code and test changes in a sandbox environment first.
Using Workbench for Deleting Apex Triggers
One way to delete Apex Triggers in Salesforce’s production environment is using Workbench. Developers often use Salesforce CLI or Ant Migration Tool for migration tasks. However, Workbench provides a simple process for this specific operation.
Steps to Delete Apex Triggers
Step 1: Create a destructiveChanges.xml file
The first step is creating a destructiveChanges.xml file. This file lists all the Apex Triggers you want to delete.
Ensure to replace “YourTriggerName1” and “YourTriggerName2” with the names of the Apex Triggers you aim to remove. Set the version to your Salesforce org’s current API version.
You can create the file in Notepad by copying the code, modifying the necessary parts, and saving it with the required file name.
*Please note that you can use the same instructions to delete Apex Classes. Simply insert the Apex Class name and change “ApexTrigger” to “ApexClass”.
Step 2: Create a package.xml file
The next step involves creating a package.xml file within the Salesforce production environment. Here’s an example of how it should look:
Replace 52.0 with your org’s current API version.
Step 3: Compress the files
After preparing both files, compress these XML files into a .zip file. Avoid creating unnecessary directory structures. Make sure both files are at the root of the .zip file.
Initially, I made the mistake of placing the files in a separate folder and then attempting to compress that folder. This action, however, led to the creation of two compressed folders, rendering them unusable for this purpose. The correct approach is to compress both files directly. Doing so will result in a single ZIP folder, with all necessary files neatly contained within it.
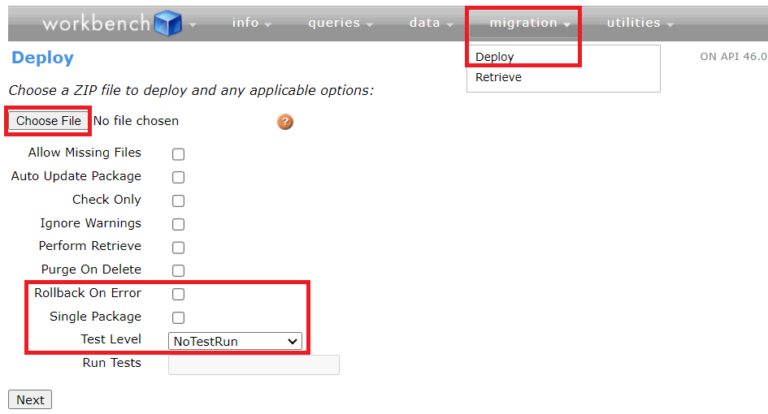
Step 4: Deploy using Workbench
- Visit Workbench and log in using your Salesforce credentials.
- From the top menu, select
migrationand then choosedeploy. - Click
Choose a fileand select the .zip file you prepared in the previous step. - Make sure to check the ‘Single package’ checkbox.
- Ensure that the
Rollback On Erroroption is checked. This is equivalent to setting rollbackOnError to true. If an error occurs during deployment, this ensures all changes will be rolled back, leaving the org in its original state. - Set the
Test Levelto your desired level of testing. This is a mandatory step to deploy the changes. Salesforce will run tests as it does when deploying a Change Set. - Click
Next, review your selection, and then clickDeploy.
Step 5: Check deployment status
After deployment, check the status of the operation. In Salesforce’s production environment, go to Setup -> Deployment Status. Look for your recent deployment and check the status. If it’s a success, the Apex classes listed in the destructiveChanges.xml file are now deleted. If the deployment failed, click on it to see the details and understand the issue.
Conclusion
By following this guide, you should have a clearer understanding of how to delete Apex Triggers in Salesforce production environment. It’s crucial to tread carefully when dealing with a production environment to avoid creating larger issues down the line. Always remember to back up your code before making any changes. And with this knowledge, you are now equipped to smoothly uninstall Managed Packages that have created Apex Triggers.